The 2001 Spacesuit Restoration Project is a project to restore a 2001 spacesuit based on surviving pieces of original 2001 spacesuits. Although it is well known that most all of the props, sets, etc were destroyed upon completion of the film, a very few pieces did survive. One of these surviving pieces was the red space helmet worn by Keir Dullea as Commander Dave Bowman in the film. (See Artifacts)
Thus this spacesuit restoration project consists of the restoration of original 2001 spacesuit components, and replication of missing spacesuit components. These components combined together will make up a complete spacesuit. The restoration of original 2001 spacesuit components is described below, as well as the efforts in fabricating (replicating) the missing parts of the spacesuit.
The spacesuits depicted in the film 2001: A Space Odyssey consisted of three types. There were two lunar types and one Discovery type. The term "Discovery" refers to the spacesuits used on the Discovery spacecraft. The lunar spacesuits were silver suits with white helmets, while the Discovery spacesuits were colored basic colors (red, yellow, blue, green).
The first version of lunar spacesuit is shown in the TMA-1 sequence. These spacesuits feature silver fabric suit bodies, white helmets, a very small oxygen tube from the backpack to the helmet with no helmet mounted hose connector, no leg mounted mating ring for attaching the ring of the boots, and brown/tan colored boots. There are no arm control (push button panels) on the spacesuits arm.
The second type of silver lunar spacesuit is shown in the film when the Aires spacecraft descends down toward the Clavius lunar base complex while three suited astronauts watch from the overlooking crater rim. It is believed that scene was filmed later in production (after the Discovery sequence) and the Discovery suits were reused (repainted silver). This is apparent as the spacesuit legs have mating disconnect rings for the boots and the helmets have the large oxygen hoses as did the Discovery suits. The suits also used the gray colored boots as did the Discovery suits. The most telling sign is that the suits have the arm mounted push button control panels as did the Discovery suits. Further, inspection of surviving 2001 silver suits confirm they were re-painted silver.
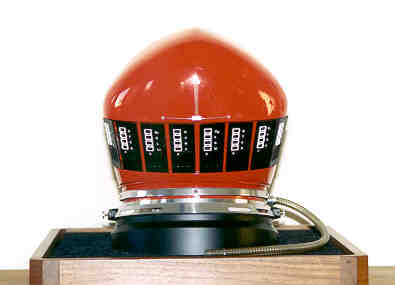
Red Helmet
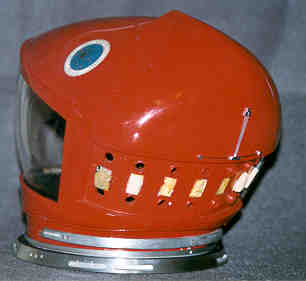
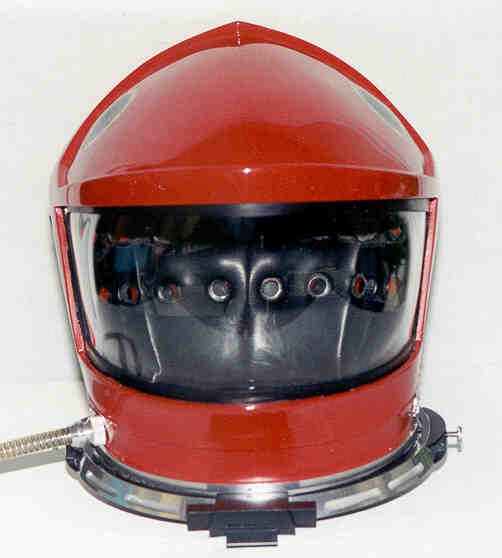
The red helmet was missing a proper faceplate, missing the air hose connection, missing 7 of the 8 black panels on the rear, and missing the antenna on the rear. The neckring was moderately oxidized. Restoration of the helmet to date has been to fabricate a proper faceplate, hose connection, the black panels on the rear, and the antenna. The neckring has been cleaned and polished, one missing small metal part replaced and the black paint touched up. The helmet shell paint was moderately cleaned, and a few small chips touched up. Other than that, the helmet paint is original. The decals show extensive crazing due to age with several chips. These have not been repaired, nor are there any plans to do so due to the fragile nature of the decals. They are still in relatively good condition, although one was damaged by a museum during an exhibit. The inside of the helmet has the original padding and lining. The only repair was to re-attach the padding along the bottom edge of the helmet shell.
Helmet during restoration. Fabrication and attachment of the antenna is compete.
Boots
The boots have not been restored, and may not be. There is some flaking of the gray paint, but not enough to warrant refinishing. The metal disconnect rings at the top of the boots have been polished to remove 30 years of oxidation.
Flight Coveralls
The flight coveralls are in good condition and no restoration is planned. The silver thread used on the chest wings has tarnished, but the thread is too fragile to allow polishing.
Neckring
This neckring, from a white helmet, will be polished and repainted since the paint is in unserviceable condition. The latching mechanism will require some minor work to make it functional. This neckring will be placed on a reproduced helmet shell for use on a silver suit.
Overview
Every effort possible has been taken to accurately fabricate the suit to its true form and measurements. In doing so, most all of the parts to be fabricated are based on measurements of the few other original pieces which have survived. Extensive searching has yielded suit parts, in the hands of different individuals. Those individuals have been gracious enough to allow me to measure the parts for duplicating.
Since I have some parts from the red suit, the yellow suit, the green suit, and a silver suit, the plan is to replicate the missing pieces for all those suits. What that means for some suits, is that most of the entire suit will be recreated since the existing parts are very few, and sometimes only one piece. For example, the red suit will have the following reproduced: suit torso, gloves, boots, chest pack and backpack, but not the helmet. For the yellow suit it will be the helmet, suit torso, gloves, chest pack, and backpack, but not the boots. For the other suits, it will be everything except for the small pieces which exist. The bottom line is that I will be making several suits, and replicating the parts I do have for use on suits that are lacking that particular part. The bottom line here is that I will be fabricating all components of both the silver lunar spacesuits and the colored Discovery spacesuits.
Great effort has been taken to locate the original sources of components used on the suits, and to acquire the same type of components to insure accuracy. The thought here was, why duplicate a part which may be still available as originally used? This saves time in making hardware, but more importantly insures accuracy as it results in a part that is identical to the original part. The really hard part is trying to determine the source for a part that was converted for use on the suits, as well as what the part was originally. Finding a source for an original part saves a very large amount of work.
An example of this is the boot soles, which were a combination of two different patterns between the foot sole and the heel sole. I could have molded copies from the original boots which I have, but the down side of doing that is the resulting part is a copy, and there is always some potential for damage to the original boots, which is unacceptable. Fortunately, I was to determine the manufacturer of the original soles and was able to locate a limited supply in a warehouse in the UK. So I purchased original boot soles for use on the duplicate boots. However this has been costly requiring several trips to the UK to locate parts and suppliers. But it does insure accuracy.
Unfortunately, some original parts are no longer available, which requires fabricating them from scratch. One example is the webbing used on the suit torso and for the straps that attach the chest and backpack to the suit. I found that the sizes used 30 plus years ago are no longer made, as well as the weave pattern. So I had webbing specially woven to match the original size and pattern of the suit webbing. This was done by a webbing mill in the UK, which happens to make webbing used in harnesses for Martin Baker ejection seats. They were very accommodating in allowing me to visit their facility and look at currently available webbing as well as excess stock from previous runs. Since none of the available material matched what I needed I had webbing specially woven to the size of the original suit webbing. Although my needs were small, they did a special run to make webbing for this project.
While in the UK, I also visited the company who makes pressure sealing zippers. These zippers were used on the original 2001 suits. In addition to a tour of their manufacturing facility , and an overview of the products they have made over the years, they custom made a 'sample zipper' for my inspection to the specifications of the 2001 originals. By the way, they currently make the pressure sealing zippers used on the orange ACES S1035 launch and re-entry space suits used on the Space Shuttle.
Since there are many parts which were custom built for the original 2001 suits, such as the all the metal components for the suits (neck rings, wrist wrings, chest pack controls, and back pack controls), there is no source for original hardware. Thus these parts were also custom made for this project . Existing original 2001 suit parts were used as patterns and new components were machined from the same metals as used on the original 2001 suits. (No cast plastic reproductions were used). Each part is hand machined to within 5 one-thousandths of an inch (0.005 inches) or better. This requires having a lathe and a milling machine, which I acquired over the years in anticipation of this project. This also requires the fabrication of special tooling to cut and hold the parts during fabrication. In fact, I think the cost of tooling alone has exceeded to cost of the lathe and milling machine.
One of the problems I have encountered in doing this project is partly due to me being a perfectionist (which is some times a curse). However I believe on of the lasting legacies Mr. Kubrick left us with, is the accuracy and perfectionism in his work. So I have adopted that philosophy in doing this project. Perfectionism - - - anything less is unacceptable.
Perfectionism results in high quality, but it can also be frustrating. An example of this has to do with fabricating the fabric parts for the suits. I was making patterns off of one of the original silver suit torsos, but did not have confidence that I was making "good" patterns. After all, I was not a pattern maker, and didn't know the tricks of the trade to get them correct. This might seem like a simple thing to do, however trying to pattern compound curves is not all that easy. So I enlisted some professional help. When I got the patterns, I checked them against the pattern section I had made, just out of curiosity, to see how far off I was from what professionals were able to do. To my surprise there was a very large difference in some areas. I thought I couldn't have done that poor of a job in making the pattern section, so I checked the professionally made pattern against the suit, and found the patterns did not exactly match the suit. I found my pattern was more accurate, and so with renewed confidence I made all of the patterns. The suit torso has a very sculpted shape, which gives it that characteristic look of the 2001 spacesuit. Also, the existing suit was 30 plus years old ,and the fabric had stretched in some areas. I spent countless hours correcting the patterns to remove the effect on the stretched fabric.
A similar problem arose when I was making the quilted fabric panels for the suit body. I hired a seamstress to do the sewing. She ended up wasting several fabric panels because she did such a poor job in sewing the panels. Also, I had to wait forever to get them back from the seamstress. I found she wasn't working on them for weeks, and then sewed them as quickly as possible to get them done. The type of fabric used necessitated the sewing all be done in the same direction to prevent any wrinkling of the fabric. However, to save time she would run the panel through the machine to make one line of stitching, then run the machine in reverse to make the next row of stitching. The resulting stresses on the fabric resulted in herring -bone V-shaped wrinkles in the fabric panel. I explained this to her, but she just didn't get it. So I went and bought an industrial upholstery sewing machine, and in two days of practicing I was sewing strait lines with no wrinkles. The resulting panels looked like the original suit panels.
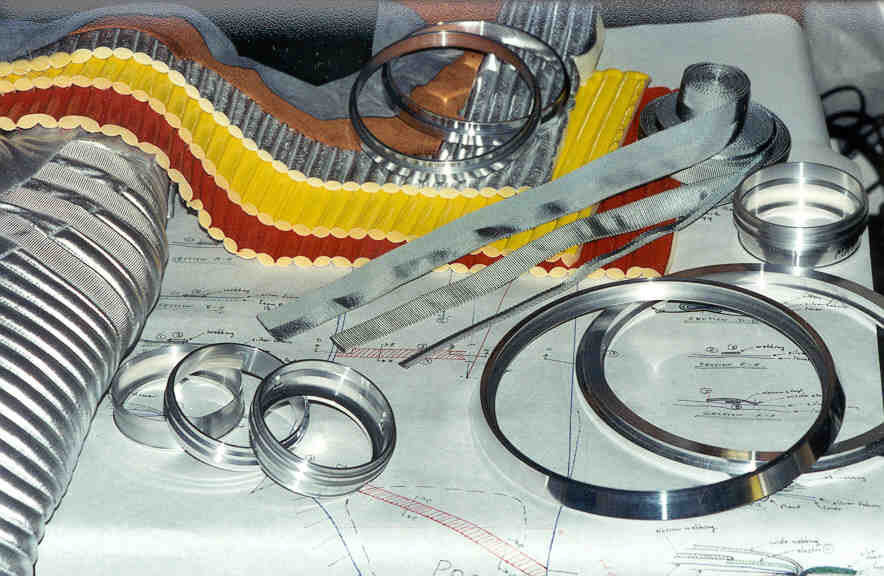
Each part of the suit requires its own unique manufacturing processes. You will see some of these processes and unique tooling in the images of this project.
Here is an image which shows of some of the materials being used in the suit, parts that have been machined, or are in the process of being machined, and the shoulder/arm of a silver suit. These are all resting on an example of the detailed drawings used for construction of the suit.
Helmet
The master pattern of the 2001 helmet is almost complete. It is accurate as it is molded off of an original 2001 helmet. The next step will be to make a mold of the master pattern. Photos will be added soon.
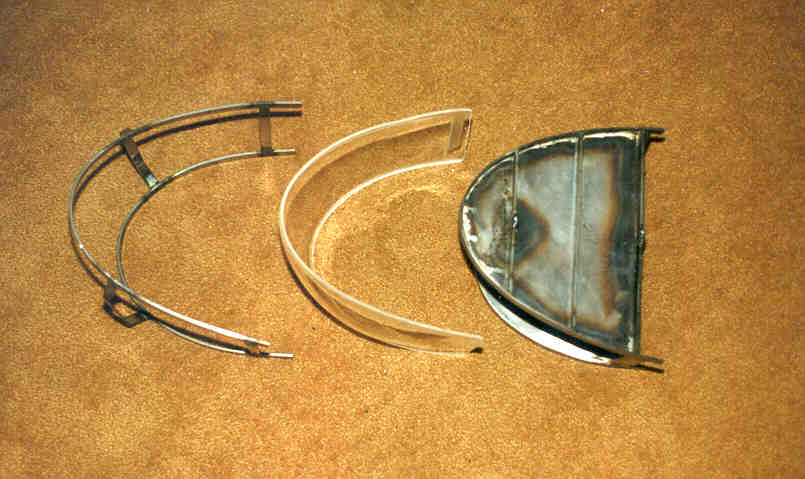
Since the visor in the original red helmet needed replacing, I had to come up with a method for making accurate visors. I built a fixture to hold a piece of Plexiglas cut to the correct shape. The fixture with the Plexiglas is placed into an oven, and air pressure is forced into the fixture cavity. This causes the Plexiglas to bow outward until the correct curvature is achieved. It took a few attempts to make a correct visor (one actually blew up due to too much air pressure).

The only problem with this approach is the finish of the visor (curvature, waviness) is highly dependent on the temperature of the Plexiglas, the air pressure, and any uneven cooling effects during the cool-down time. So I started to make a modification to the fixture to help eliminate some of these effects. I am adding a hard mold cavity into which the visor will be blown, so that after the plexiglass has expanded to the maximum extent, fluctuations in the air pressure during the cooling down phase will not affect the shape of the visor.
Suit
The first reproduction suit made was a silver suit. This was done a a final test of the patterns. It came out so well it will be finished into a complete Lunar type 2001 spacesuit. Other Discovery type suits are in fabrication at this time. Photos will be added in the next update.
Gloves
Boots
The correct type of leather has been obtained for both the Lunar and Discovery type spacesuit boots. A Last (the form used to build the boot on) is about half done. Soles from the original manufacturer of the original 2001 boots were purchased a few years ago, and will be attached once the boot upper part is finished. The machined boot disconnect rings will be added after the boot is together.
Chest Pack
I have determined the correct shape and size of the chest pack. Since I have not found an original chest pack to work from, this was done using photos. The photos were scaled using identical hardware as was used on the original chest packs, so I have confidence the size and shape are correct. I have also finally determined all of the printing on the chest pack. I was able to decipher the wording for the top mounted buttons from a film frame enlargement, and I was able to verify the wording was correct by inspecting a photo on display at the Kubrick Exhibit in Frankfurt. Drawings of the chest pack are being finalized. The next step is to make a master pattern from which to make a mold. Harness attachment fittings are almost finished. Photos will be added soon.
Backpack
The backpack will be reproduced based on measurements of a surviving original 2001 backpack. These measurements consist of both dimensional and angular data. Over 240 measurements were required to fully capture an accurate representation of the backpack. The next step is to start fabricating masters of all the backpack parts. These will be usd to make a mold for makng fiberglas copies for the suits. The backpack will match the originals. Minor imperfections I found in the original 2001 backpack will be corrected in the reproduction. Photos will be added soon.
The harness attachment fittings for several suits are almost finished. A sample Y harness for attaching to the lowerpart of the backpack has been made. Photos will be added soon.
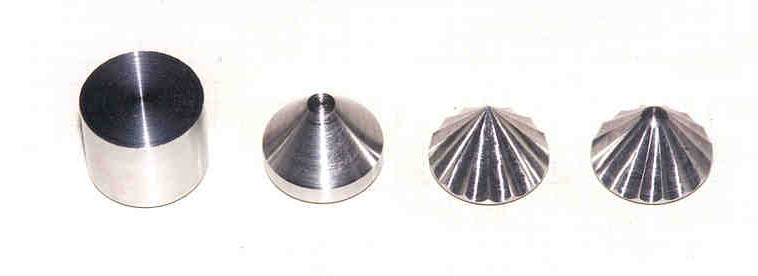
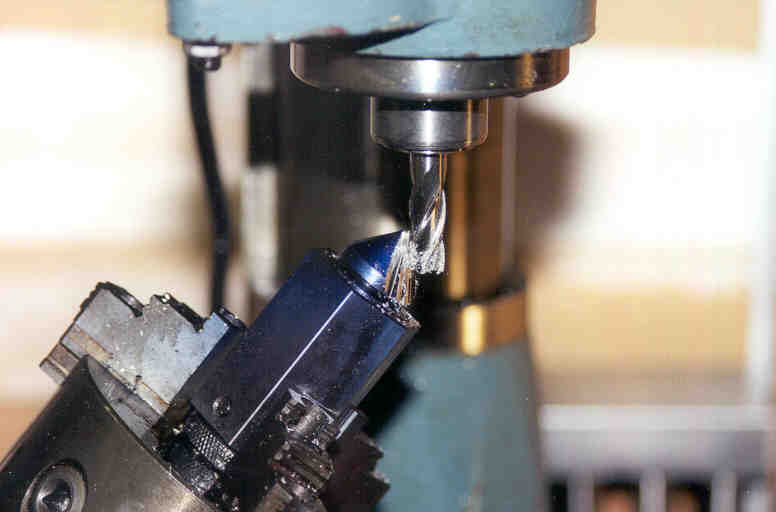
The controls on the backpack are all machined aluminum to match the original. I made detailed drawings of each original part so they could be duplicated. Here are some pictures of making one of the backpack controls. This is a complex piece as it has flutes of varying depth along the outside which act as finger grips.
This page is under construction. There is more to come.
Back to Contents